![]() = CHOOSE BRUSHES DIRECTORY
(set of brushes)
= CHOOSE BRUSHES DIRECTORY
(set of brushes)
![]() = BRUSH DISPLAY
= BRUSH DISPLAY
![]() = BRUSH STEPS CONTROL
= BRUSH STEPS CONTROL
![]() = PAINT STYLE CONTROL
= PAINT STYLE CONTROL
![]() = TRANSPARENCE CONTROL
= TRANSPARENCE CONTROL
Painting |
Painting and creating art-work has never been so easy than now : you can use Focus Photoeditor as your preferred painting program :
The main painting features that Focus photoeditor supports are :
|
|
|
One of the first thing you want to do when you start a new painting is to choose the right brush : Focus Photoeditor not only gives you the ability to choose among a wide set of preexisting brushes but also lets you completely customize the brush settings and also to add your custom brushes for reusing them in future paintings .
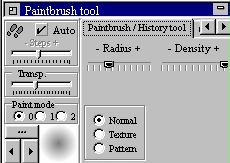
After you selected the tool you want to use from the bottom toolbar , for example the paintbrush (airbrush) tool , the tools window displays 2 panels : the panel on the left represents all the current brush settings ; the panel on the right represents the actually selected tool settings .
If you want to change the brush shape then click one of the 2 buttons to go
back or forward a brush : ![]() : you will
see the currently selected brush in this picture
: you will
see the currently selected brush in this picture ![]() ;
;
If you want to load brushes from an other directory ( by default the brushes
are stored as bmp files in your program installation subfolder named : "brushes"
) , then click this button : ![]() and you
will see a dialog where you can select the new brushes directory :You can browse
the new brushes set loaded in the usual way with the buttons :
and you
will see a dialog where you can select the new brushes directory :You can browse
the new brushes set loaded in the usual way with the buttons :![]() .
.
You can add new brushes to those available in Focus Photoeditor : to add new brushes create a directory and put there your brushes : the brushes have to be bmp files with sequential names like : brush1.bmp , brush2.bmp etc.. if you don't want to create a new directory you can put the files in the default directory for the standard Focus Photoeditor brushes .
It is important that you understand how the steps control works
: ![]() ;
;
As you can see in the picture the check box with the caption : "Auto" is checked : this means that the program tries to choose automatically the best step for painting with the selected tool : however if you are a bit expert you can turn the check box off and move the slider to the steps number that you prefer : High steps number means that 2 consecutive brushes are more far ; Low steps grants closer distance between 2 consecutive brushes but this requires more processing power : you can use very low steps distance if you have a powerful CPU processor on your computer , otherwise painting could result a bit slow ..
There is an other very important option that you absolutely have to know about : for some cases you would like that the distance between 2 consecutive brushes be very large : then go in the Main menu : File->Options->Painting->Large Steps and check it ! you will see that now when you paint the steps are much larger then before : this allows you to use very artistic brushes like those that we provide on our site for your download pleasure .
Well that's all about brushes steps !
You can even choose your preferred painting style with Focus
Photoeditor :![]()
For example someone prefers more fluidity when painting other prefers more control etc..
You can choose among 3 paint styles :
0: offers the best control of the painting : with this style the brush steps is increased when you try to paint faster and decreased when you paint slower .
2: offers more natural painting style with not much computer control over the steps : the steps are fixed by the number that you selected before start the painting process and are not adjusted accordingly to your painting speed .
1: It is a compromise between 0 and 2 style .
With the paintbrush tool you can create very nice paintings using color , texture or pattern : the difference between using texture or pattern is that the first merge the texture and the color with the canvas , the second use the texture as a pattern for the color : the lighter parts of the texture will be transparent when painted on the canvas with the pattern mode .
If you want to paint only the texture without color , use the multiple tool instead .
The options for the paintbrush tool are : Radius and Density : use Radius to change the size of the brush ; use Density to decrease the number of pixels in the brush that are painted .
Clone :
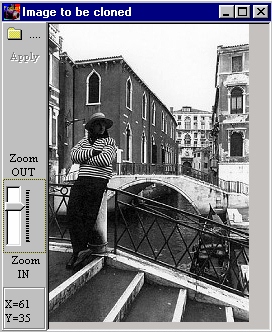
The clone tool lets you to clone a picture on to an other
picture : the source is displayed in a window that opens when you select the
clone tool , while the target is the current image layer or the background . To
start a new cloning click on the point of the source picture from which you want
to start to clone : note that if you don't click any point the (0,0) point is
assumed as starting point : then start cloning on the target picture . Every
time you need to start a new cloning you have to select an other source point
otherwise the old one will be still assumed to be valid . You can select
the clone source from file (![]() )or set as
clone source the current target picture . To set the current target picture as
clone surce right click on the clone source image and then click the item in the
popup menu that is shown .
)or set as
clone source the current target picture . To set the current target picture as
clone surce right click on the clone source image and then click the item in the
popup menu that is shown .
Sometimes you may need to resize the clone source : to perform
this use the Zoom control for the clone source and then click apply : ![]() .
.
 |
|
Multiple tool :
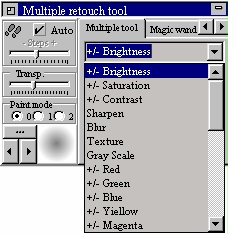
The multiple tool lets you perform a wide set of retouch operations on pictures like :
increase-decrease brightness , saturation , contrast etc..
there are also many nice effects to apply by painting with this tool : to have a list of all possible ways to use this tool , you have to browse in the action list of the tool window at the multiple tool page that is here represented :

You can regulate for this tool also Radius and intensity of the selected effect : there are about 30 different effect to choose from .
The History tool is a very useful tool you will surely appreciate : you can paint on the current image layer or background a previous undo : what is the advantage of doing this ? If you made a mistake for example by painting with the paintbrush but you don't want to loose all the rest of the painting that is ok then use the history tool to restore the part of the image where you made the mistake instead of using the full undo button .
To decide which undo you want to paint with use the undo selector on the tool window at the history tool page . If the undo selector is set to -1 the history tool will paint the original picture as you loaded it from file the first time .
With this tool you can erase/restore the layer alpha channel : try it on a image layer to discover how powerful it is : this tool like all the other painting tools supports all the different brushes you can use .